Bedroom Galaxy Themed Room
VirginiaLynne likes to share her creative ideas for DIY home renovation and maintenance.
Do you have a Lego-obsessed kid? Me too! When he wanted a Lego decorating theme, I found that the brand merchandise was expensive and sometimes not exactly what we wanted. To make an affordable theme room for our son, Brendan, we came up with our own designs and focused on making a room that allowed him to store and display his extensive collection.
The room we made for our son has gone through different phases as we added more storage and shelves for display. None of these projects took more than a few hours, and they weren't very expensive.
Our Lego Room
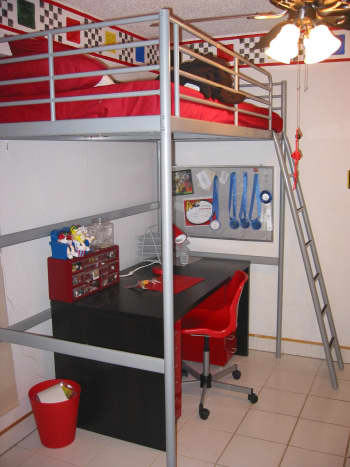
Lego border shows above loft bed and desk.
DIY Lego Brick Border
One way to make a theme room is to paint the walls in primary colors. My son's room is small, and I didn't want to make it darker with paint, so we painted the walls and ceiling grey and built a Lego border. You could do this border in the middle of the room, but we did it at the top so it could be seen easier. This was very easy to do, and you don't have to be a painting expert.
Supplies
- 1 oz. bottles of Acrylic Paint in black, red (two), blue, and green
- checkerboard stencil
- black stencil paint and brush
- 1-inch brush
- painter's tape (a couple of rolls)
- 1-2 inch bottle cap (depending on the size of your bricks

Step-by-Step Instructions for Border
Here is how you should paint your borders.
Red Line at Top of Border:
- Put a line of painter's tape on the ceiling all around the room (This is easier if you have another person helping you to hold one side as you measure the wall about 6 feet down).
- Measure down 1 inch and put another line of tape all around the room.
- Use a brush to paint the space between the two pieces of the tape red.
Red Line at Bottom of Border:
- Measure down 12 inches and put another line of Tape all around the room.
- Measure down 1 inch and put another line all around the room.
- Paint in between those two pieces of tape with red.
Lego Bricks:
The squares can be any size. We made ours 9" squares which are separated by a black checkerboard (my son liked the Racers set at that time). You could do all bricks and do squares and rectangles.
- Make a cardboard template of the size of bricks you want to use.
- Measure your wall and space out your bricks evenly. We just marked out 1-foot intervals all around.
- Trace around your brick templates on the wall.
- You can either freehand paint it, or use painter's tape around the edges to make them neater.
- When they are dry, use the bottle-cap top dipped in black paint to make the circles on top of the brick.
- You can even write "Lego" on one if you want.
Checkerboard (optional):
- Tape the checkerboard stencil to the wall.
- Use stencil paint and a stencil brush to tap the black paint on the stencil (check to make sure you are doing this at a 90-degree angle, so the brush doesn't get underneath the stencil.
- When you are done, lift the stencil carefully up. Wipe off the stencil before going to the next section of wall.
Room Decorations
Embossed Lego paper can be used to do a lot of decorations very inexpensively. The paper comes in 12" by 12" sheets in a variety of colors. Sometimes you can find this at a scrapbooking store, or it is available inexpensively on Amazon. For less than $10.00, you can get enough to decorate a whole room. Here are some of my ideas.
Make a Lego Light Switch
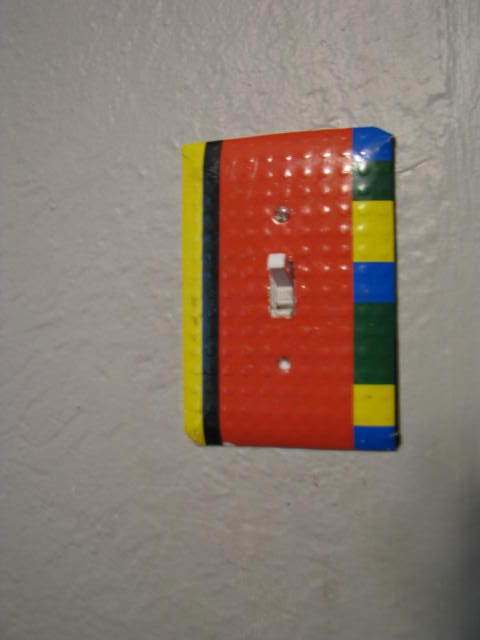
Lego light switch.
VirginiaLynne, CC-BY, via HubPages
Light Switch
I actually didn't think this would last very long, but my son has had it on his wall for over eight years now, and it still looks great. The trick is to cover it with Mod Podge to make it easy to clean. This is a straightforward craft you can make in 10 minutes.
Materials
- Lego Paper
- light switch
- scissors
- Mod Podge
Step-by-Step Instructions
- Take the light switch off the wall (be sure to turn off the electricity first).
- Put the light switch face down on the Lego paper and trace around it (including the holes for the light switch and screws).
- You will want to cut the paper out about 1/4 to 1/2 inch larger than the traced line (so you can turn the paper under the edge. Use sharp scissors or an Exacto knife to cut precisely around the light switch hole(s) and the holes for the screws.
- Put Mod Podge or glue (glue is not as shiny) on the front of the light switch. Place the light switch down on top of the paper (line up the light switch hole). Press the paper down firmly.
- On the paper which sticks out over the edge, make small cuts up to the edge of the light switch every 1/4 inch or so. Put Mod Podge on the underside of the switch and press these edges down firmly.
- Brush over the whole switch with a thick layer of Mod Podge (it will dry clear). Let dry (about 30 minutes to one hour)
- Put light switch back on the wall using screws (you may need slightly longer screws to hold it in place).
Framed Scrapbook Pages

Lego Scrapbook using Lego paper and pictures from Legoland.
Framed Scrapbook Pictures
We had a lot of Lego pictures of my son playing with friends, having birthday parties, and going to Legoland. I made a few scrapbooking pages from these photos and framed them to put in his room. That was an excellent way for him to remember those good memories while adding to the theme decorations.
Materials
- Frames
- acrylic paint in primary colors
- Lego paper
- pictures
- Lego memorabilia (flat items)
- glue dots or another adhesive for pictures
Read More From Dengarden
Instructions
- You can buy special 12" by 12" frames, or do like I did and take frames you already have, or buy inexpensively (I got mine at the Goodwill). I chose to do three frames to put across one wall of the room by my son's bed.
- Paint the frames in primary colors (I did one red, one blue and one green) using acrylic paints.
- Make your scrapbook pages. If you buy 12" x 12" frames, you can just put your pictures on the Lego paper with adhesive and put decorations on them. Since I didn't want to buy special 12" by 12" frames, I took the cardboard from the frame to help me measure. Then, I just taped the Lego papers together until they fit.
- Use adhesive or tape to hold the scrapbook page to the cardboard back of the frame, then put the frame, glass and scrapbook page together.
- Decorate the frame by gluing on buttons, or glue on some Lego plates, and your child can attach his own small creations to the frame for more decoration and personalization.
Initial Art
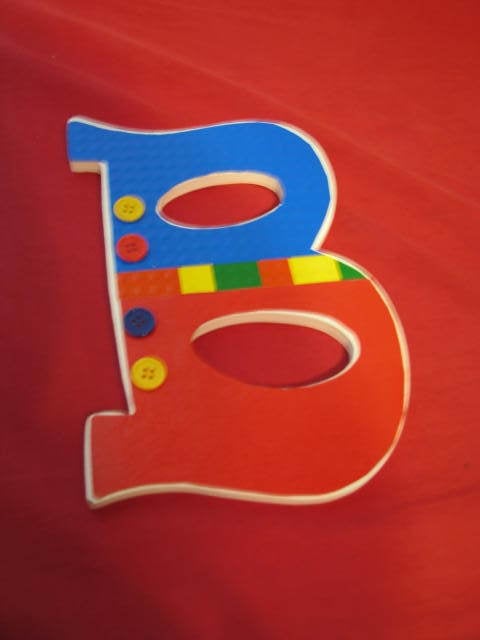
Name Letter
VirginiaLynne, CC-BY, via Hubpages
Letters
One way that kids can help decorate their room is to make decorated initial letters. You can find wooden letters at a craft store or Amazon. You can do the first letter in your child's name, their initials, or spell out their whole name or a favorite word, maybe "Lego?" This craft can be a good party activity too.
Materials
- Wooden, paper mache or other letters
- Lego paper
- Mod Podge
- scissors
- Buttons, stickers, or other decorations
- Hot glue gun (for heavier embellishments)
Instructions
- Take the letter and put it upside down on the back of the Lego paper. Trace around the letter. Be careful you don't trace it so that the letter will be backward.
- Cut out the paper. Put Mod Podge on the wooden letter. Place the paper on top and smooth with your fingers.
- Decorate the letter with buttons, stickers, or other decorations.
- Hang on your wall and enjoy!
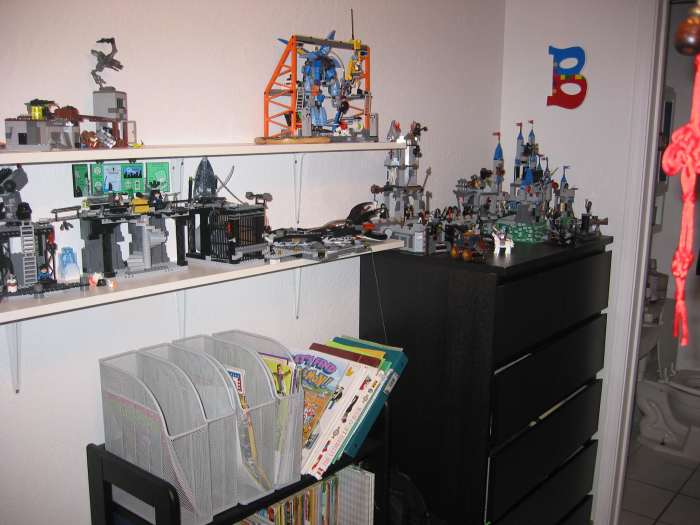
Display Shelves
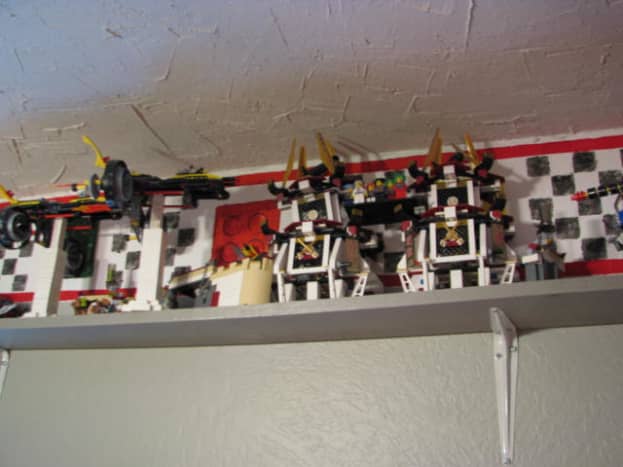
These helves can hold many creations, large or small. My son uses them both for storage and display.
How to Build Shelves to Display Builds
We got the idea of high shelves for displaying sets from an adult Lego fan. So we built shelves all around my son's room just under his border.
Materials
- 1" by 10" wood
- paint and brushes
- 1" by 2" wood for corner support
- shelf brackets
- screws
- electric drill and screwdriver
- measuring tape and pencil
I made these very quickly and cheaply by buying 1" by 10" wood, painting it grey to match his walls, and then installing them by using small pieces of wood screwed on to the wall at each corner. I added a few shelf supports in the middle of the room to keep the shelves from sagging. The whole project took me just a morning, and my son has loved having his creations up on display. It has also encouraged him to keep his sets together and not lose the pieces.
VirginiaLynne, CC-BY, via HubPages
Furniture and Accessories
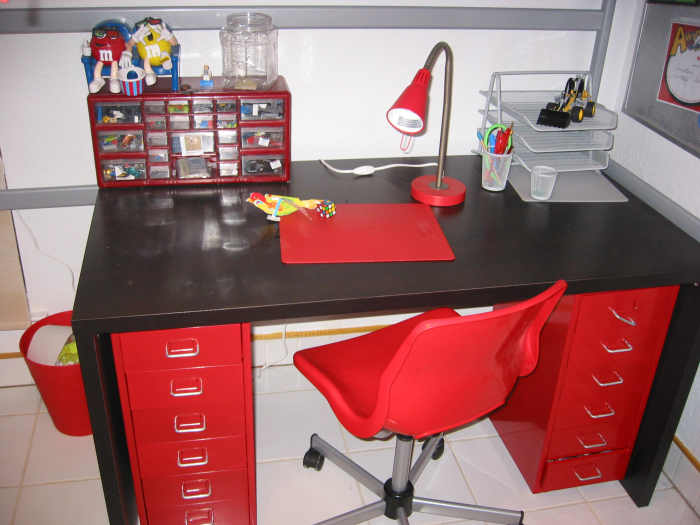
Lots of room to build!
VirginiaLynne, CC-BY, via HubPages
Furniture and Accessories
Complete your room by buying inexpensive bedding and room accessories in primary colors or one color. My son chose to use red, black, and chrome for his room. We got most of the items inexpensively through IKEA or Walmart:
- Chrome Bed
- Black Desk
- Black Dresser
- Red bedding with a black pillow and throw.
- Red trashcan
- Chrome desk accessories
- I painted a corkboard with silver spray paint.
- Red metal drawers (for brick storage, they fit under the desk)
Over the years he has had his room this way, we've moved the furniture around. We eventually had to change from having the loft bed when he got too tall for it. Now he has his bed on the floor and uses his desk for making Lego creations.
5 Years Later...
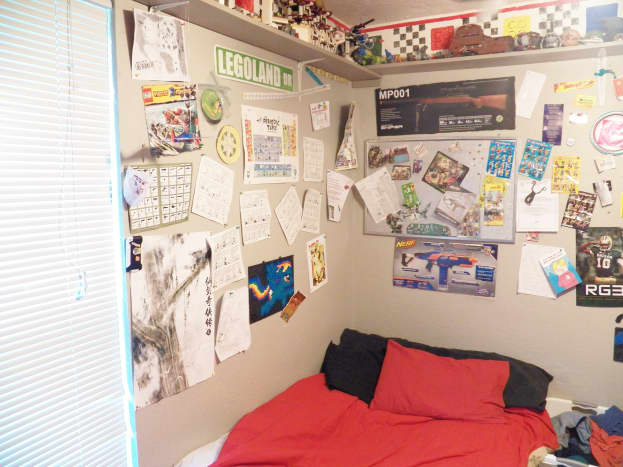
Changing to a Teen Room
We created the theme room for my son when he was in about 5th grade, and although he has gotten interested in other things besides Legos, he has been able to incorporate these into his room.
Since he is now in high school and is over six feet tall, we had to take out the loft bed. Now he just has a mattress on the floor. He has pinned up lots of his memorabilia all over the walls. It isn't as neat as mom would like, but as a scrapbooker, I can appreciate the fact that he has decorated his room with memories.
At one time, the cork board was painted in primary colors like bricks. When he went more towards a chrome look, I just re-painted it with chrome paint. The brick outlines still showed through, so my son likes it a lot (when you can see it thought the things pinned to it!).
Good luck creating your own theme room! If you have any ideas, please share them below in the comments!
Davis Wolf on August 26, 2014:
The ideas in this article are very creative. It also does not hurt that they are inexpensive as well! The light switch is by far my favorite and so easy to do. Overall, this is a great use of space and fun for the kids. I wish I could have had a room of this caliber when I was a young boy.
LEGOdomenick on March 04, 2014:
Some great ideas here.
Stephanie from Texas on January 12, 2014:
So many great ideas here! My son, 10, is borderline obsessive with Legos lol My husband and I have been thinking about a Lego themed room for him for a year or so. I think I'm going to send this hub to him so he can see for himself. Thanks for sharing!
Toy Tasting from Mumbai on October 05, 2013:
I have been a huge Lego fan, since childhood. These ideas are amazing, I wish I had them as a child. But, I can surely share them with my 10 yr old nephew. He will go crazy having a room having a Lego design. Thanks for sharing the information. :)
Virginia Kearney (author) from United States on October 04, 2013:
Thanks FullofLove--I actually bought my first batch of Lego Paper at a scrapbooking store near Legoland California. I was very happy to find it was available on Amazon, so that is where I buy it now. The sheets are also great for using as placemats at a Lego Party. Hum,maybe that is another hub! I've had probably 10 Lego parties between all my kids!
FullOfLoveSites from United States on October 04, 2013:
Cute room! This is the first time I've seen and heard a Lego paper. I hope I could find it in stores around here.
The video is a Lego-lovers' paradise! My niece would love that. Thanks for sharing. :)
Casey Johnson from Sanger, Texas on October 03, 2013:
Very impressive hub. I love the use of space beneath the bunk bed. My kids would be envious if they saw this. Thanks for sharing!
CraftytotheCore on October 02, 2013:
Wow this is fantastic! My son loves legos. I am loving those red drawers. I'd want some for my own use. :D
Guest on October 02, 2013:
That lego light switch is brilliant. Love it!
Eiddwen from Wales on October 01, 2013:
What a wonderful hub; voted up and shared.
Eddy.
Source: https://dengarden.com/interior-design/Easy-Lego-Room-Design-Ideas


0 Komentar